

A PIR motion sensor sees someone walk into the room, but not someone sitting at a desk or reading on the sofa. After a few minutes the light goes off. An mmWave radar also detects a person who isn’t moving, because it picks up breathing and small body movements.
This sensor puts three things in one enclosure: an HLK-LD2410C radar, an M5Stack ENV III temperature, humidity and pressure sensor, and an M5Stack ATOM Lite microcontroller (ESP32). It hangs on the wall over an electrical box and goes straight into Home Assistant through ESPHome.
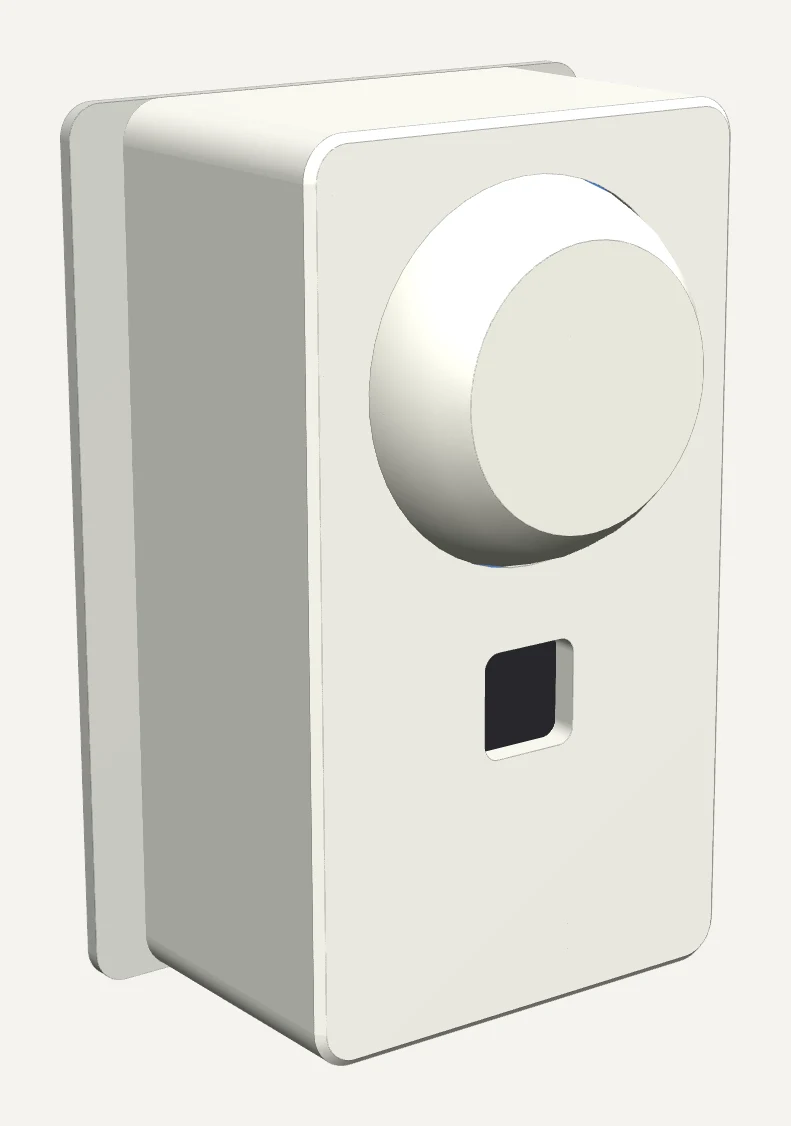
What the enclosure does
The radar sits in a printed Ø46 mm ball that you turn by hand, 25° in each direction. A sensor hung next to the door can be aimed at the sofa or the desk. The whole enclosure is 60 × 107 × 38 mm, and the head sticks out 10 mm in front.
The USB-C cable comes in from the wall side and plugs into the ATOM inside the enclosure, so you can’t see it from outside. You press the ATOM button through a window in the front. The body slides onto the back plate until 2 snap latches click in at the top, and one more screw holds it from below.
The ENV III lies at the bottom, behind a divider, above a hole in the enclosure. The point was to keep the thermometer as far as possible from the warm ESP32.
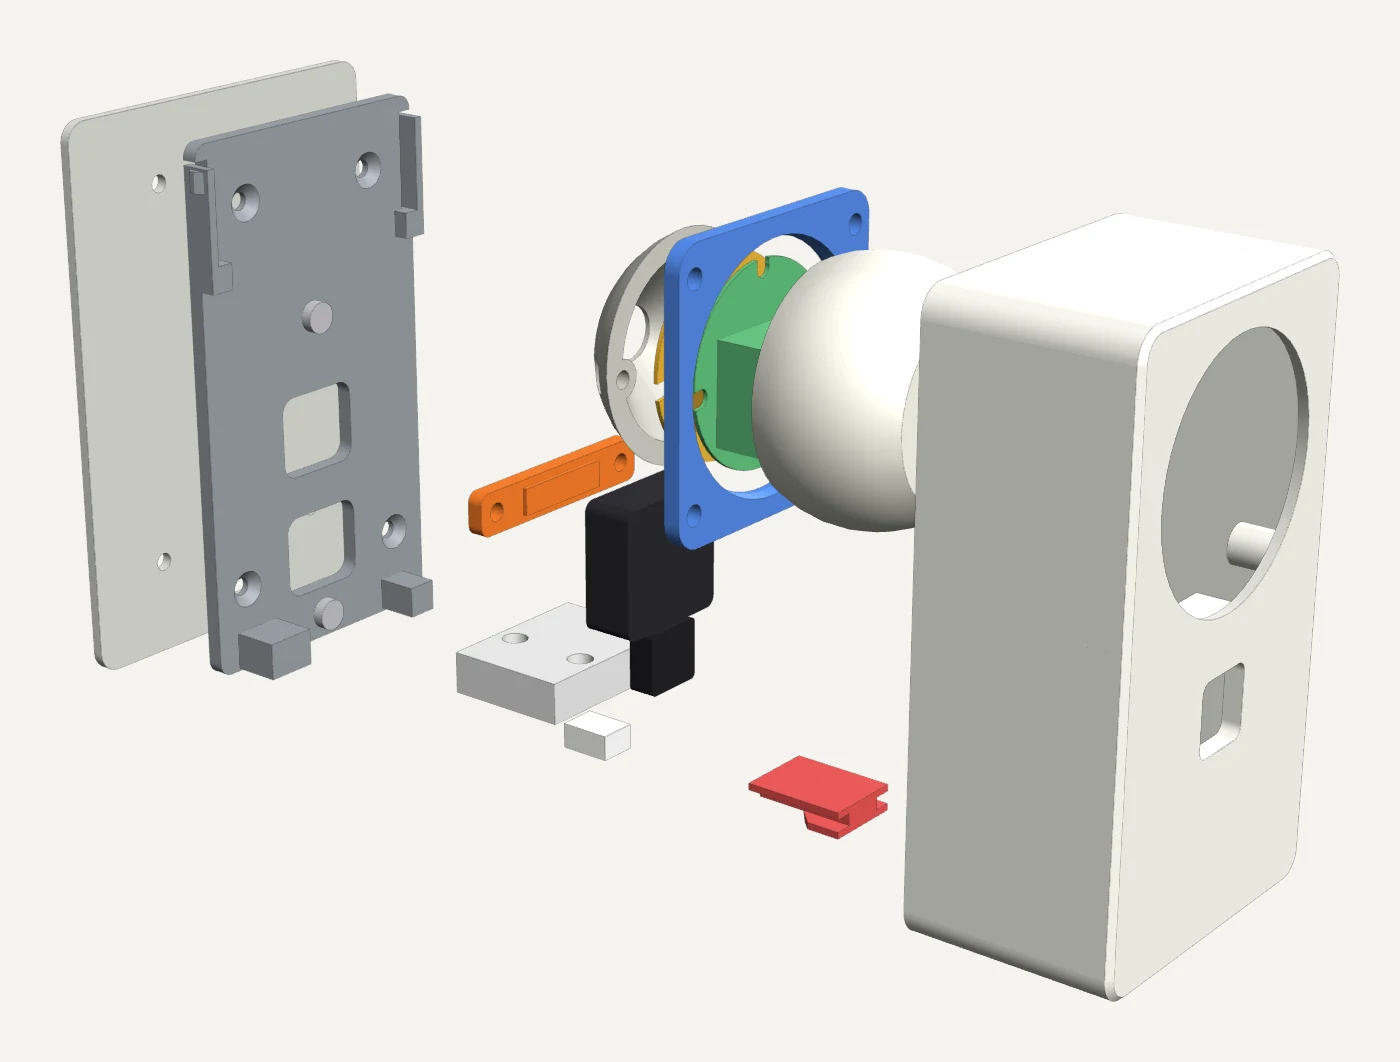
Parts list
I bought everything in Polish shops. The links show which part I mean; any shop with the same part will do.
| Part | Where I bought it |
|---|---|
| M5Stack ATOM Lite | Botland |
| M5Stack ENV III (SHT30 + QMP6988) with a Grove cable | Botland |
| HLK-LD2410C radar, 24 GHz | Allegro |
| 20 cm USB-A to USB-C cable with a 90° angled plug (aceyoon) | Amazon |
| 230 V to USB 5 V 2.1 A power module for a wall box | Amazon |
| Flush-mounted Ø60 mm wall box or a surface-mounted box | screws 60 mm apart |
| 4 Dupont jumper wires, male, about 10 cm | for the radar, no soldering |
| M3 screws: 7 × M3 × 8 (1 of them countersunk), 3 × M3 × 10 |
The angled USB-C plug may stick out under the ATOM by 12 mm at most and be at most 5 mm thick, and the cable has to leave it sideways. A straight plug would need an enclosure 25-30 mm taller.
Printing
All parts print without supports, in PETG. The filament must not contain metal, carbon or graphite, because they damp the radar signal.
| Part | Orientation on the bed | Notes |
|---|---|---|
| housing (body) | front down | |
| back_plate | back down | latch beams solid: 100% or at least 4 walls |
| head_front (front of the ball) | flat face down | 100% infill, this is the radar cover |
| head_back (back of the ball) | split plane down | |
| radar_frame, radar_retainer | flange down | |
| grove_cover | rear end down | |
| clamp_ring, atom_holder | flat | |
| trim_plate (optional) | flat | only if the plate has to cover a hole in the wall |
The flat window of the head is 3.6 mm thick. Its inner side is 12.4 mm in front of the antennas, as Hi-Link recommends in the LD2410C documentation. The window thickness is half a wavelength in the material, calculated for a permittivity of about 3. I have not measured it for PETG, it is a calculation, so after assembly it’s worth checking detection at the edge of the field of view.
Wiring
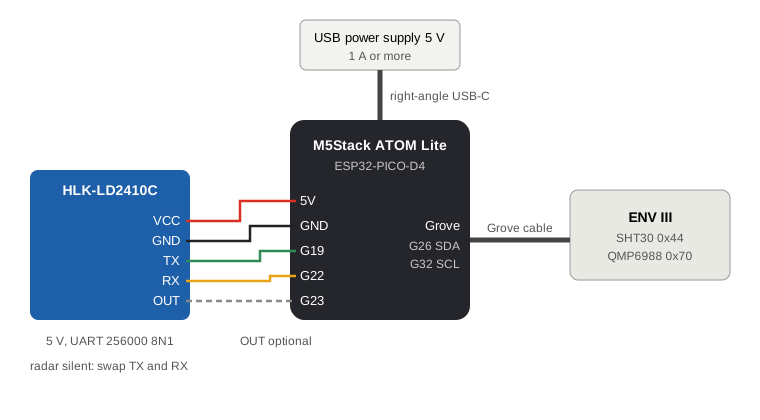
The ENV III plugs into the ATOM’s Grove socket (I2C on G26 and G32). That leaves the headers on the underside of the ATOM for the radar:
| LD2410C | ATOM Lite |
|---|---|
| VCC | 5V |
| GND | GND |
| TX | G19 |
| RX | G22 |
| OUT (optional, not used by the firmware) | G23 |
The LD2410C needs 5 V and more than 200 mA, and its outputs are 3.3 V, so they connect straight to the ESP32. It talks over UART at 256000 baud. TX and RX are the pin labels on the radar board, and wired this way the radar works for me. If yours stays silent, swap these two wires. Mind the power polarity too: wired the wrong way round, the radar heats up.
Assembly
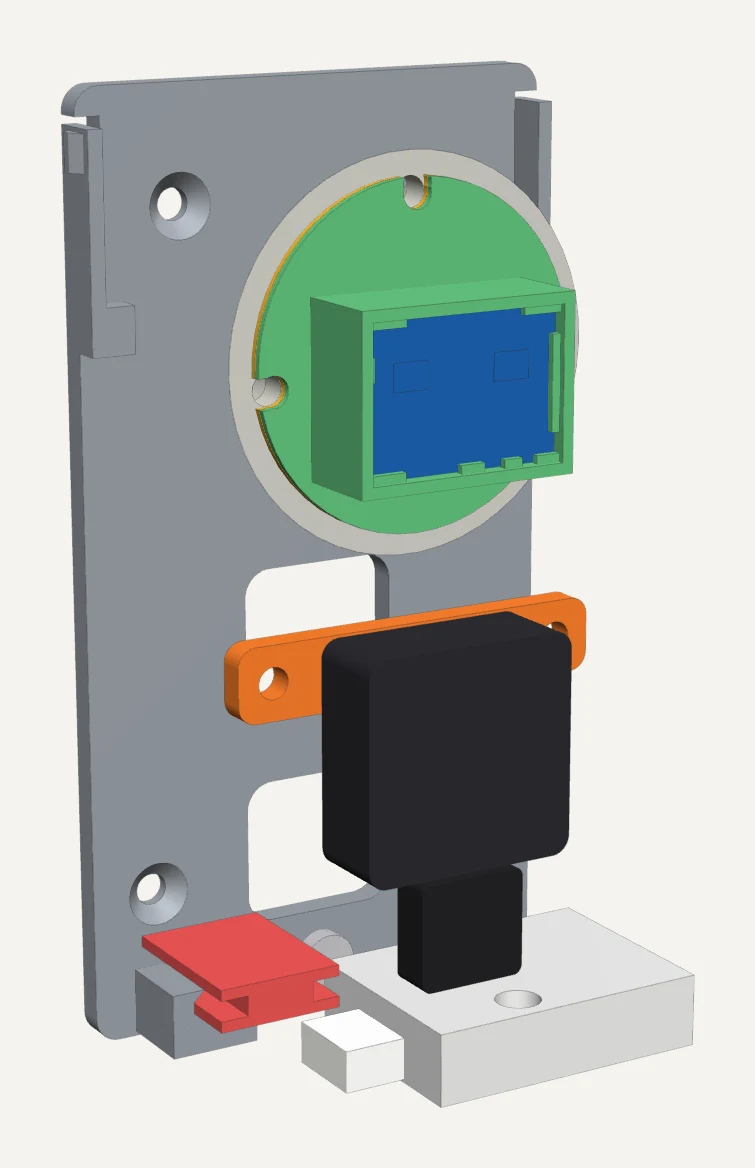
- Connect the Dupont wires to the LD2410C pins. No soldering is needed. Slide the board into the radar frame with the antennas facing forward and the pins up, and hold it with 2 dots of hot glue. Put the frame into the front half of the ball, fit the retainer, run the wires through the hole in the back half and join the halves with 3 M3 × 10 screws.
- Push the ball into the socket in the body from behind, fit the ring and fix it with 4 M3 × 8 screws. Tighten until the ball holds its position but still turns by hand.
- Insert the ATOM into its frame from behind, button to the front and sockets down, and press it in with the holder (2 screws). Connect the radar wires.
- Plug the Grove cable into the ENV III and slide the sensor into the rail at the bottom from behind, perforation down. Plug the other end into the ATOM, push the cable into the slot in the divider and close it with the cover.
- Screw the back plate to the wall box, with the USB-C cable passed through the hole in the plate. Plug the angled connector into the ATOM from below, cable to the side.
- Push the body onto the plate until the latches click and drive in the screw from below. To take it off, remove the screw and pull the body towards you.
Power from the wall box
At home the sensor hangs on a standard European Ø60 mm flush-mounted box, the kind that sits behind a socket or a light switch, and in the workshop on a surface-mounted box. Inside the box is a 230 V to USB 5 V 2.1 A power module, and a 20 cm USB-C cable with an angled plug runs from it to the ATOM. There is no cable or plug-in adapter on the wall.
The module connects to mains wiring. Do it with the circuit switched off, and if you aren’t qualified, ask an electrician.
The hole in the wall around the box is sometimes wider than the enclosure; then a 74 mm trim plate goes under the back plate. The plate can also be screwed to a bare wall with 4 wall plugs.
Firmware: ESPHome
The full config is in presence-sensor.yaml, written for ESPHome 2026.9.1. The sensor exposes to Home Assistant:
- radar data: presence, motion, still presence, target distances and energy, and in engineering mode the energy in every gate,
- temperature and humidity from the SHT30 and pressure from the QMP6988 (the QMP6988 measures temperature too, but that entity is disabled by default because the SHT30 reading is more accurate),
- the RGB LED, LED signalling and WiFi signal strength,
- radar settings: hold time, maximum motion and still gate, thresholds for every gate, gate resolution, engineering mode and the radar’s Bluetooth,
- temperature correction, signalling brightness and the humidity threshold for the LED.
The key parts:
substitutions:
  temp_fixed_offset: "-3.5"

esp32:
  board: m5stack-atom
  cpu_frequency: 80MHZ

i2c:
  sda: GPIO26   # Grove: ENV III
  scl: GPIO32

uart:
  id: ld_uart
  rx_pin: GPIO22
  tx_pin: GPIO19
  baud_rate: 256000

ld2410:
  uart_id: ld_uart

binary_sensor:
  - platform: ld2410
    has_target:
      name: "Presence"
    has_moving_target:
      name: "Moving Target"
    has_still_target:
      name: "Still Target"

sensor:
  - platform: sht3xd
    address: 0x44
    temperature:
      name: "Temperature"
      filters:
        - lambda: return x + ${temp_fixed_offset} + id(temp_offset).state;
    humidity:
      name: "Humidity"
  - platform: qmp6988
    pressure:
      name: "Pressure"
First flash:
- Install ESPHome (
pip install esphome==2026.9.1). Savepresence-sensor.yamland next to it asecrets.yamlwith an API key (template: secrets.example.yaml). The key is 32 bytes in base64; generate one withopenssl rand -base64 32. The same key encrypts updates over WiFi, so there is no separate OTA password. - Compile the firmware with
esphome compile presence-sensor.yaml. The file for the first flash is.esphome/build/presence-sensor/.pioenvs/presence-sensor/firmware.factory.bin. - Connect the ATOM to your computer with a USB-C cable, open web.esphome.io in Chrome or Edge, choose “Install” and pick that file. You set up WiFi in the same window.
- Home Assistant finds the device by itself in the ESPHome integration and asks for the API key. The device is called
presence-sensor-xxxxxx, ending with part of its MAC address, so one file can be flashed to several sensors. You can rename it in Home Assistant. - Later versions upload over WiFi:
esphome upload presence-sensor.yaml --device <IP>.
LED signalling
The LED in the ATOM shows the sensor’s state. Blue means motion, green means presence without motion, and orange means humidity at or above the threshold (70% by default), for example in a bathroom after a shower. When the room is empty, the LED is off. Brightness (10% by default) and the humidity threshold are set in Home Assistant. With the “LED Indicator” switch off, you can control the “LED” light by hand.
Temperature calibration
The ESP32 warms the inside of the enclosure, even with the ENV III behind the divider. That is why the CPU runs at 80 MHz instead of 240 MHz and a fixed correction, temp_fixed_offset, is added to every reading; in my file it is -3.5. For the rest there is the “Temperature Offset” slider in Home Assistant, from -5 to +5 °C. After a few hours of running, compare the reading with another thermometer and set the difference with the slider.
Radar tuning
The LD2410C splits its range into 9 gates (g0-g8), 0.75 m each by default. If the sensor picks up movement behind a wall or in the hallway, lower “Max Move Distance Gate” and “Max Still Distance Gate” in Home Assistant. Each gate’s sensitivity is set with the thresholds from “g0 move threshold” to “g8 still threshold”. Engineering mode shows the energy in every gate, which makes the thresholds easier to choose. You can also use the HLKRadarTool app over Bluetooth.